Note
Click here to download the full example code
Transfering a model from PyTorch to Caffe2 and Mobile using ONNX
In this tutorial, we describe how to use ONNX to convert a model defined in PyTorch into the ONNX format and then load it into Caffe2. Once in Caffe2, we can run the model to double-check it was exported correctly, and we then show how to use Caffe2 features such as mobile exporter for executing the model on mobile devices.
For this tutorial, you will need to install onnx,
onnx-caffe2 and Caffe2.
You can get binary builds of onnx and onnx-caffe2 with
conda install -c ezyang onnx onnx-caffe2.
NOTE: This tutorial needs PyTorch master branch which can be installed by following
the instructions here
# Some standard imports
import io
import numpy as np

from torch import nn
import torch.utils.model_zoo as model_zoo
import torch.onnx
Super-resolution is a way of increasing the resolution of images, videos and is widely used in image processing or video editing. For this tutorial, we will first use a small super-resolution model with a dummy input.
First, let’s create a SuperResolution model in PyTorch. This model comes directly from PyTorch’s examples without modification:
# Super Resolution model definition in PyTorch
import torch.nn as nn
import torch.nn.init as init


class SuperResolutionNet(nn.Module):
    def __init__(self, upscale_factor, inplace=False):
        super(SuperResolutionNet, self).__init__()

        self.relu = nn.ReLU(inplace=inplace)
        self.conv1 = nn.Conv2d(1, 64, (5, 5), (1, 1), (2, 2))
        self.conv2 = nn.Conv2d(64, 64, (3, 3), (1, 1), (1, 1))
        self.conv3 = nn.Conv2d(64, 32, (3, 3), (1, 1), (1, 1))
        self.conv4 = nn.Conv2d(32, upscale_factor ** 2, (3, 3), (1, 1), (1, 1))
        self.pixel_shuffle = nn.PixelShuffle(upscale_factor)

        self._initialize_weights()

    def forward(self, x):
        x = self.relu(self.conv1(x))
        x = self.relu(self.conv2(x))
        x = self.relu(self.conv3(x))
        x = self.pixel_shuffle(self.conv4(x))
        return x

    def _initialize_weights(self):
        init.orthogonal_(self.conv1.weight, init.calculate_gain('relu'))
        init.orthogonal_(self.conv2.weight, init.calculate_gain('relu'))
        init.orthogonal_(self.conv3.weight, init.calculate_gain('relu'))
        init.orthogonal_(self.conv4.weight)

# Create the super-resolution model by using the above model definition.
torch_model = SuperResolutionNet(upscale_factor=3)
Ordinarily, you would now train this model; however, for this tutorial, we will instead download some pre-trained weights. Note that this model was not trained fully for good accuracy and is used here for demonstration purposes only.
# Load pretrained model weights
model_url = 'https://s3.amazonaws.com/pytorch/test_data/export/superres_epoch100-44c6958e.pth'
batch_size = 1    # just a random number

# Initialize model with the pretrained weights
map_location = lambda storage, loc: storage
if torch.cuda.is_available():
    map_location = None
torch_model.load_state_dict(model_zoo.load_url(model_url, map_location=map_location))

# set the train mode to false since we will only run the forward pass.
torch_model.train(False)
Exporting a model in PyTorch works via tracing. To export a model, you
call the torch.onnx._export() function. This will execute the model,
recording a trace of what operators are used to compute the outputs.
Because _export runs the model, we need provide an input tensor
x. The values in this tensor are not important; it can be an image
or a random tensor as long as it is the right size.
To learn more details about PyTorch’s export interface, check out the torch.onnx documentation.
# Input to the model
x = torch.randn(batch_size, 1, 224, 224, requires_grad=True)

# Export the model
torch_out = torch.onnx._export(torch_model,             # model being run
                               x,                       # model input (or a tuple for multiple inputs)
                               "super_resolution.onnx", # where to save the model (can be a file or file-like object)
                               export_params=True)      # store the trained parameter weights inside the model file
torch_out is the output after executing the model. Normally you can
ignore this output, but here we will use it to verify that the model we
exported computes the same values when run in Caffe2.
Now let’s take the ONNX representation and use it in Caffe2. This part can normally be done in a separate process or on another machine, but we will continue in the same process so that we can verify that Caffe2 and PyTorch are computing the same value for the network:
import onnx
import onnx_caffe2.backend

# Load the ONNX ModelProto object. model is a standard Python protobuf object
model = onnx.load("super_resolution.onnx")

# prepare the caffe2 backend for executing the model this converts the ONNX model into a
# Caffe2 NetDef that can execute it. Other ONNX backends, like one for CNTK will be
# availiable soon.
prepared_backend = onnx_caffe2.backend.prepare(model)

# run the model in Caffe2

# Construct a map from input names to Tensor data.
# The graph of the model itself contains inputs for all weight parameters, after the input image.
# Since the weights are already embedded, we just need to pass the input image.
# Set the first input.
W = {model.graph.input[0].name: x.data.numpy()}

# Run the Caffe2 net:
c2_out = prepared_backend.run(W)[0]

# Verify the numerical correctness upto 3 decimal places
np.testing.assert_almost_equal(torch_out.data.cpu().numpy(), c2_out, decimal=3)

print("Exported model has been executed on Caffe2 backend, and the result looks good!")
We should see that the output of PyTorch and Caffe2 runs match numerically up to 3 decimal places. As a side-note, if they do not match then there is an issue that the operators in Caffe2 and PyTorch are implemented differently and please contact us in that case.
Transfering SRResNet using ONNX
Using the same process as above, we also transferred an interesting new
model “SRResNet” for super-resolution presented in this
paper (thanks to the authors
at Twitter for providing us code and pretrained parameters for the
purpose of this tutorial). The model definition and a pre-trained model
can be found
here.
Below is what SRResNet model input, output looks like. 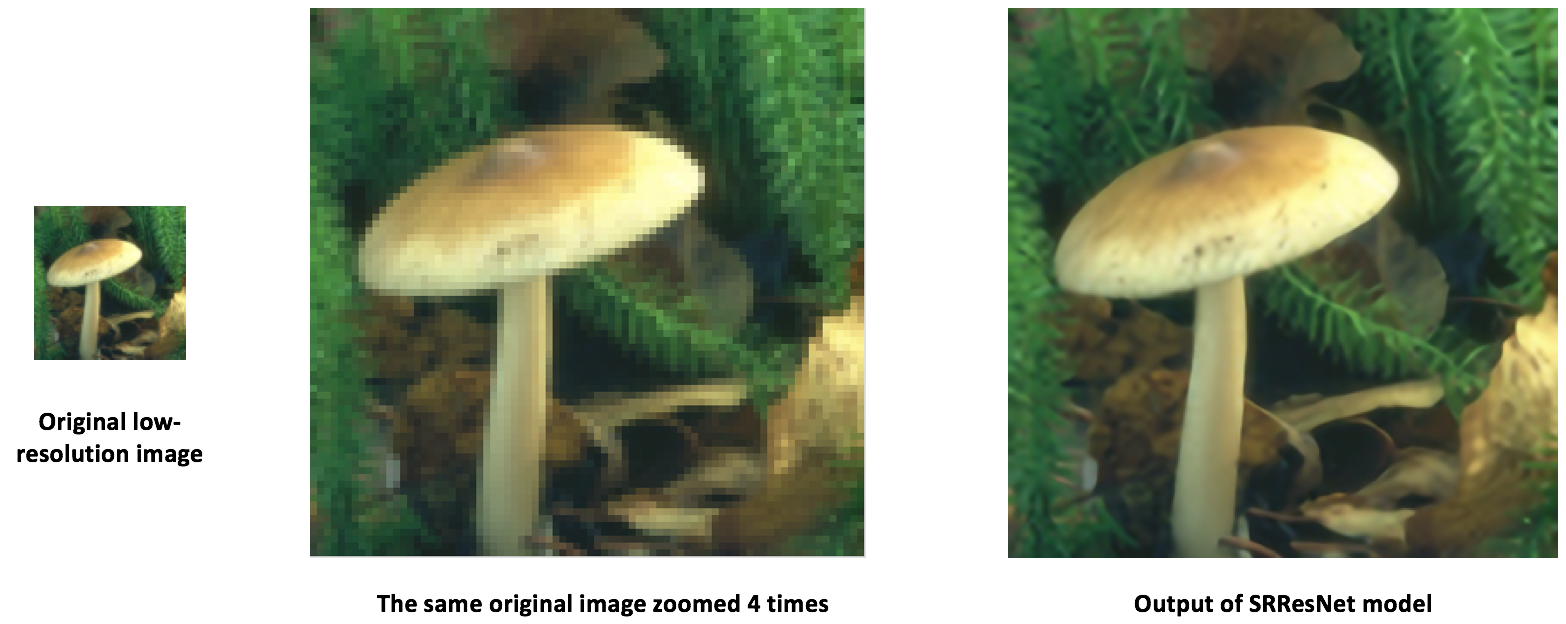
Running the model on mobile devices
So far we have exported a model from PyTorch and shown how to load it and run it in Caffe2. Now that the model is loaded in Caffe2, we can convert it into a format suitable for running on mobile devices.
We will use Caffe2’s mobile_exporter to generate the two model protobufs that can run on mobile. The first is used to initialize the network with the correct weights, and the second actual runs executes the model. We will continue to use the small super-resolution model for the rest of this tutorial.
# extract the workspace and the model proto from the internal representation
c2_workspace = prepared_backend.workspace
c2_model = prepared_backend.predict_net

# Now import the caffe2 mobile exporter
from caffe2.python.predictor import mobile_exporter

# call the Export to get the predict_net, init_net. These nets are needed for running things on mobile
init_net, predict_net = mobile_exporter.Export(c2_workspace, c2_model, c2_model.external_input)

# Let's also save the init_net and predict_net to a file that we will later use for running them on mobile
with open('init_net.pb', "wb") as fopen:
    fopen.write(init_net.SerializeToString())
with open('predict_net.pb', "wb") as fopen:
    fopen.write(predict_net.SerializeToString())
init_net has the model parameters and the model input embedded in it
and predict_net will be used to guide the init_net execution at
run-time. In this tutorial, we will use the init_net and
predict_net generated above and run them in both normal Caffe2
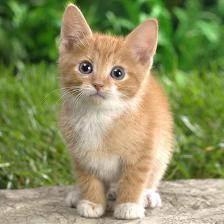
backend and mobile and verify that the output high-resolution cat image
produced in both runs is the same.
For this tutorial, we will use a famous cat image used widely which looks like below
# Some standard imports
from caffe2.proto import caffe2_pb2
from caffe2.python import core, net_drawer, net_printer, visualize, workspace, utils

import numpy as np
import os
import subprocess
from PIL import Image
from matplotlib import pyplot
from skimage import io, transform
First, let’s load the image, pre-process it using standard skimage python library. Note that this preprocessing is the standard practice of processing data for training/testing neural networks.
# load the image
img_in = io.imread("./_static/img/cat.jpg")

# resize the image to dimensions 224x224
img = transform.resize(img_in, [224, 224])

# save this resized image to be used as input to the model
io.imsave("./_static/img/cat_224x224.jpg", img)
Now, as a next step, let’s take the resized cat image and run the super-resolution model in Caffe2 backend and save the output image. The image processing steps below have been adopted from PyTorch implementation of super-resolution model here
# load the resized image and convert it to Ybr format
img = Image.open("./_static/img/cat_224x224.jpg")
img_ycbcr = img.convert('YCbCr')
img_y, img_cb, img_cr = img_ycbcr.split()

# Let's run the mobile nets that we generated above so that caffe2 workspace is properly initialized
workspace.RunNetOnce(init_net)
workspace.RunNetOnce(predict_net)

# Caffe2 has a nice net_printer to be able to inspect what the net looks like and identify
# what our input and output blob names are.
print(net_printer.to_string(predict_net))
From the above output, we can see that input is named “9” and output is named “27”(it is a little bit weird that we will have numbers as blob names but this is because the tracing JIT produces numbered entries for the models)
# Now, let's also pass in the resized cat image for processing by the model.
workspace.FeedBlob("9", np.array(img_y)[np.newaxis, np.newaxis, :, :].astype(np.float32))

# run the predict_net to get the model output
workspace.RunNetOnce(predict_net)

# Now let's get the model output blob
img_out = workspace.FetchBlob("27")
Now, we’ll refer back to the post-processing steps in PyTorch implementation of super-resolution model here to construct back the final output image and save the image.
img_out_y = Image.fromarray(np.uint8((img_out[0, 0]).clip(0, 255)), mode='L')

# get the output image follow post-processing step from PyTorch implementation
final_img = Image.merge(
    "YCbCr", [
        img_out_y,
        img_cb.resize(img_out_y.size, Image.BICUBIC),
        img_cr.resize(img_out_y.size, Image.BICUBIC),
    ]).convert("RGB")

# Save the image, we will compare this with the output image from mobile device
final_img.save("./_static/img/cat_superres.jpg")
We have finished running our mobile nets in pure Caffe2 backend and now, let’s execute the model on an Android device and get the model output.
NOTE: for Android development, adb shell is needed otherwise the
following section of tutorial will not run.
In our first step of runnig model on mobile, we will push a native speed
benchmark binary for mobile device to adb. This binary can execute the
model on mobile and also export the model output that we can retrieve
later. The binary is available
here.
In order to build the binary, execute the build_android.sh script
following the instructions
here.
NOTE: You need to have ANDROID_NDK installed and set your env
variable ANDROID_NDK=path to ndk root
# let's first push a bunch of stuff to adb, specify the path for the binary
CAFFE2_MOBILE_BINARY = ('caffe2/binaries/speed_benchmark')

# we had saved our init_net and proto_net in steps above, we use them now.
# Push the binary and the model protos
os.system('adb push ' + CAFFE2_MOBILE_BINARY + ' /data/local/tmp/')
os.system('adb push init_net.pb /data/local/tmp')
os.system('adb push predict_net.pb /data/local/tmp')

# Let's serialize the input image blob to a blob proto and then send it to mobile for execution.
with open("input.blobproto", "wb") as fid:
    fid.write(workspace.SerializeBlob("9"))

# push the input image blob to adb
os.system('adb push input.blobproto /data/local/tmp/')

# Now we run the net on mobile, look at the speed_benchmark --help for what various options mean
os.system(
    'adb shell /data/local/tmp/speed_benchmark '                     # binary to execute
    '--init_net=/data/local/tmp/super_resolution_mobile_init.pb '    # mobile init_net
    '--net=/data/local/tmp/super_resolution_mobile_predict.pb '      # mobile predict_net
    '--input=9 '                                                     # name of our input image blob
    '--input_file=/data/local/tmp/input.blobproto '                  # serialized input image
    '--output_folder=/data/local/tmp '                               # destination folder for saving mobile output
    '--output=27,9 '                                                 # output blobs we are interested in
    '--iter=1 '                                                      # number of net iterations to execute
    '--caffe2_log_level=0 '
)

# get the model output from adb and save to a file
os.system('adb pull /data/local/tmp/27 ./output.blobproto')


# We can recover the output content and post-process the model using same steps as we followed earlier
blob_proto = caffe2_pb2.BlobProto()
blob_proto.ParseFromString(open('./output.blobproto').read())
img_out = utils.Caffe2TensorToNumpyArray(blob_proto.tensor)
img_out_y = Image.fromarray(np.uint8((img_out[0,0]).clip(0, 255)), mode='L')
final_img = Image.merge(
    "YCbCr", [
        img_out_y,
        img_cb.resize(img_out_y.size, Image.BICUBIC),
        img_cr.resize(img_out_y.size, Image.BICUBIC),
    ]).convert("RGB")
final_img.save("./_static/img/cat_superres_mobile.jpg")
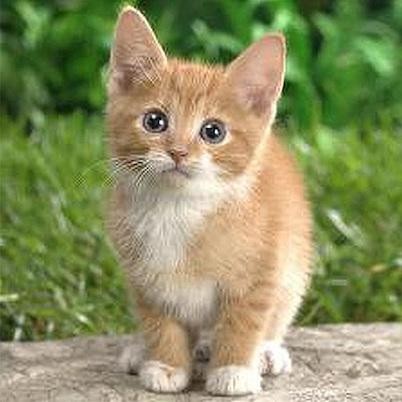
Now, you can compare the image cat_superres.jpg (model output from
pure caffe2 backend execution) and cat_superres_mobile.jpg (model
output from mobile execution) and see that both the images look same. If
they don’t look same, something went wrong with execution on mobile and
in that case, please contact Caffe2 community. You should expect to see
the output image to look like following:
Using the above steps, you can deploy your models on mobile easily. Also, for more information on caffe2 mobile backend, checkout caffe2-android-demo.
Total running time of the script: ( 0 minutes 0.000 seconds)